haproxy学习笔记
环境说明
一台haproxy的负载均衡服务器:
- 192.168.11.184
两台Dual-Master的mysql集群:
- 192.168.11.180
- 192.168.11.181
haproxy1.5.3的安装
下载haproxy1.5.3的源码
解压到/usr/local/1
tar zxvf haproxy-1.5.3.tar.gz -C /usr/local/
建立haproxy的软连接,方便以后升级(貌似这货没有什么升级的必要).然后cd进去编译安装。
注意:haproxy在编译的时候需要指定内核版本,即TARGET参数,请使用uname -a命令确定服务器内核版本。
- linux26 适用于Linux 2.2
- linux24 适用于Linux 2.4及以上版本(默认)
- linux24e 适用于Linux 2.4 with support for a working epoll (> 0.21)
- linux26 适用于Linux 2.6及以上版本
- linux2628 适用于Linux 2.6.28, 3.x, 及以上版本 (enables splice and tproxy)
- solaris 适用于Solaris 8 or 10 (others untested)
- freebsd 适用于FreeBSD 5 to 10 (others untested)
- osx 适用于Mac OS/X
- openbsd 适用于OpenBSD 3.1 to 5.2 (others untested)
- aix51 适用于AIX 5.1
- aix52 适用于AIX 5.2
- cygwin 适用于Cygwin
- generic 适用于其他系统或版本
- custom 自定义参数
1 | cd /usr/local |
haproxy1.5.3的配置及使用
在安装目录新建haproxy.cfg配置文件1
touch haproxy.cfg
编辑haproxy.cfg1
2
3
4
5
6
7
8
9
10
11
12
13
14
15
16
17
18
19
20
21
22
23
24
25
26
27
28
29
30
31
32
33
34
35
36
37
38
39
40
41
42
43
44
45
46
47
48
49
50#全局配置
global
log 127.0.0.1 local0 #全局日志。在后面详解如何配置
maxconn 40000 #单个进程的最大连接数
chroot /usr/local/haproxy
user haproxy
group haproxy
#debug
daemon #是否以守护进程在后台运行,相当于haproxy里的-D命令。与debug方式互斥
nbproc 1 #指定作为守护进程运行的时候,需要创建多少个进程,默认只创建1个,需要daemon模式开启
spread-checks 2
quiet
pidfile /usr/local/haproxy/haproxy.pid #指定haproxy的pid文件
#默认配置
defaults
log global #采用全局配置中的日志配置
mode http #模式
option dontlognull #不记录空连接
retries 3 #连接失败后的重试次数
option redispatch #在连接失败或断开的情况下,允许当前会话被重新分发
maxconn 2000
timeout server 1m
timeout connect 1m
timeout client 1m
timeout http-request 1m
timeout queue 1m
#监听haproxy状态
listen status
mode http
bind 0.0.0.0:80 #监听端口
stats enable
stats uri /status #统计页面uri
stats refresh 10s #自动刷新间隔
stats realm Global\ statistics #统计页面密码框上的提示文本
stats auth admin:admin #用户名和密码
stats hide-version #统计页面隐藏haproxy的版本信息
#监听mysql集群的情况
listen mysql-cluster
mode tcp
bind 0.0.0.0:3306 #监听端口
log global
log 127.0.0.1:514 local1 info #mysql-cluster的日志
option httplog
option mysql-check user haproxy #使用mysql-check的用户
balance roundrobin
server mysql-cluster-1 192.168.11.180:3306 weight 1 check inter 1s rise 2 fall 2
server mysql-cluster-2 192.168.11.181:3306 weight 1 check inter 1s rise 2 fall 2
说明:mysql负载均衡要用tcp模式,在使用负载均衡前,需要mysql能让haproxy的ip远程访问,inter表示健康检查的间隔,单位为毫秒 可以用1s等,fall代表健康检查失败2回后放弃检查。rise代表连续健康检查成功2此后将认为服务器可用。默认的,haproxy认为服务时永远可用的,除非加上check让haproxy确认服务是否真的可用。
ps:mysql中新建用户可用以下语句实现,现在还不知道mysql5.6.13版本中这样直接添加用户的默认权限是什么。1
2create user 'haproxy'@'192.168.11.184';
flush privileges;
新建haproxy的用户组及用户1
adduser haproxy
启动haproxy1
./haproxy -f haproxy.cfg
在浏览器里输入192.168.11.184/status即可看到haproxy的运行状态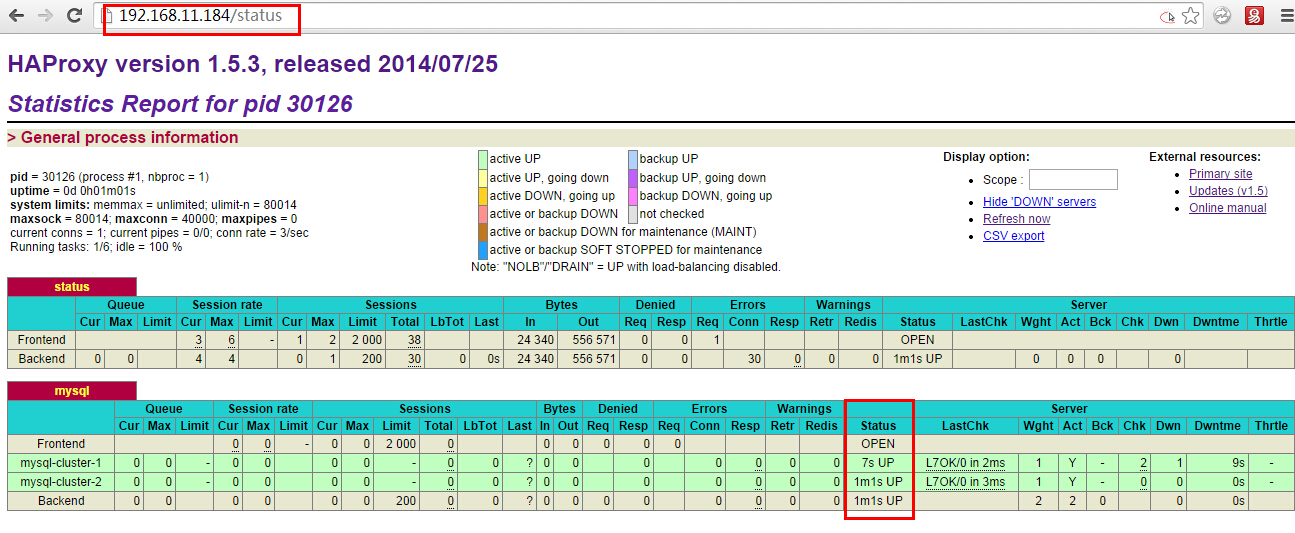
至此,可以看到haproxy已经正常启动及正常监控mysql集群了。
也可以通过haproxy监听的3306端口访问数据库了。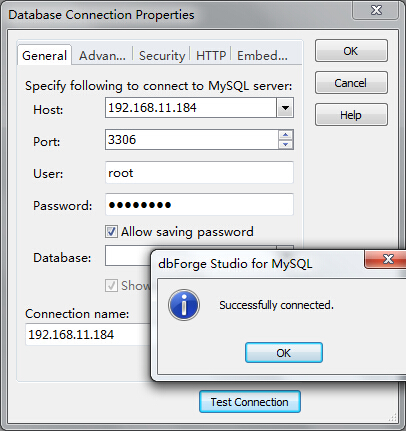
附:日志配置
haproxy配置文件中使用了系统日志,需要在/etc/rsyslog.d/haproxy.conf增加haproxy的日志配置文件1
vi /etc/rsyslog.d/haproxy.d/haproxy.conf
haproxy.conf内容如下:1
2
3
4
5
6
7
8
9
10
11
12local0.* -/var/log/haproxy0a.log #对应haproxy.cfg中配置的local0的日志
local1.* -/var/log/haproxy1a.log #对应haproxy.cfg中配置的local1的日志
$ModLoad imudp
# load the imudp module for rsyslog
# provides UDP syslog reception
# start UDP server on this port, "*" means all addresses
$UDPServerRun 514
# local IP address (or name) the UDP listens should bind to
$UDPServerAddress 127.0.0.1
ps:
/var/log/haproxy0a.log前边的”-“减号意味着取消日志同步写入。
这可以优化一下磁盘写入,尤其是在非常繁忙的系统中。
不过如果突然断电,可能会损失一些未写入硬盘的日志。
重启syslog服务1
/etc/init.d/rsyslog restart
然后就可以在/var/log/haproxy1a.log查看mysql-cluster的日志了。